Showing posts with label vegetables. Show all posts

Wednesday, 1 June 2016

GRILLED SWEET CORN+GARLIC AIOLI

Grilled corn is a great addition to any meal and due to its versatility, could be served as a salad or as a side dish or just as a tasty snack.  It is very low in calories, has no carbs, not much sugar or cholesterol and most importantly it tastes great.

I sometimes grill the cobs so I can add the kernels to a salad.  Their smoky flavour and different texture bring a totally new dimension to any simple salad making it look more colourful and exciting.

It is a great accompaniment to any grilled meat or chicken, especially burgers.  Barbecuing your proteins and vegetables at the same time is also a great time-saver and therefore, ideal for a mid-week quick dinner fix.

So let's get cooking.

To feed 4 people you need:
4 cobs corn, husks and leaves removed
2-3 tbs olive oil
1 tbsp sweet paprika
4 pieces of foil about 15cm in length
Salt and freshly ground black pepper

Method: If you are in a great rush, you can cut the cobs in half to speed up the cooking process.  I also find that the small pieces are much easier for handling.  Cut four pieces of foil, each to accommodate 2 pieces of corn.  Place the cob pieces, or two halves, in the centre of the foil, splash with olive oil, sprinkle with paprika, salt and pepper and rub the seasoning all over the corn, seal the foil on all sides into parcels, repeat for the remaining pieces.  

Pre-heat the BBQ to 180C and arrange the parcels on the griddle.  To make sure that the corn is cooked evenly, turn the parcel around every 5 to 7 minutes depending on the size of the cob until the kernels have browned but not burnt.  It may take you between 15 to 20 minutes to cook the corn, so if you are barbecuing any meat too, add it to the grill later.

Once the corn is cooked, remove it from the grill and bring to the table.  Let everyone unravel his own parcel but be careful that it is quite hot.

Grilled corn is quite tasty on its own but I love to serve it with garlic aioli on the side.  Aioli is a lovely and pungent type of mayonnaise that is used to enhance the dish to give it a real kick.


There are as many versions and names for this condiment as there are chefs and cooks, however here is my take on garlic aioli.  It is quite easy to make, I personally love Jamie OIiver's recipe and follow it when I have time.

Mine, however, is a short-cut version where I use commercially made mayonnaise but it tastes good nevertheless.  

You need:
2 tbs Whole Egg mayonnaise
1 tbs fat free yogurt 
1 tbs cold water (if needed)
1 clove garlic finely grated
Salt and freshly cracked black pepper
A pinch of cayenne paper or chili flakes (for the heat lovers)

Combine all the ingredients in a small bowl, if the mixture looks too thick, add a splash of cold water but make sure it is not runny, place in a small bawl and serve alongside the corn.


Monday, 8 February 2016

WATERMELON AND BASIL SALSA

Sweet, savoury and crunchy this watermelon salsa is a perfect accompaniment to any grilled meat or chicken. 

Watermelon + basil salsa
It reminds me of a hot Sydney summer and I love to eat it chilled.  I think it goes especially well with my Chicken Tabaka, the sweetness and crunchiness of the watermelon enhances the crispiness of the chicken skin and the aroma of basil highlights the flavours of the meat.

To make a salsa you need:
600 gm watermelon flesh
Half a cup of tightly packed basil leaves
½ of a red chili, seeds removed
1 small red onion finely chopped
2 tbsp extra virgin olive oil
Salt and freshly cracked black pepper

Cut the watermelon into pieces of similar thickness and then slice them into thin long strips.  Holding it all together, turn the whole lot around by 90 degrees and again slice into thin strips.  You will end up with a very evenly, finely sliced little cubes of watermelon which is what salsa is all about.  
Watermelon + basil salsa

Watermelon + basil salsa

Watermelon + basil salsa
Add finely chopped red onion, chilies and torn basil leaves, pour in the extra virgin olive oil and season with salt and pepper.  Mix the salsa gently and give it a taste.  The saltiness should be in perfect balance with the sweetness, you should also taste some salt and the aroma of the basil leaves.  Adjust the seasoning to your liking and serve as an accompaniment to “Chicken Tabaka” or other grilled meat.

Enjoy!!!


Friday, 22 January 2016

PAN - ROASTED VINE BABY TOMATOES WITH PINE NUTS

In of the SundayLife magazine's publications Adam Liaw (an Australian lawyer and a celebrity chef) shared with us a couple of summer recipes which his family loves to eat around this time of the year.  He also made an interesting comment on how the Asian cuisines are all about seasonal eating, quoting the Japanese saying “All good food has its time” and I couldn’t agree more.  When I was living in Russia 22 years ago, we didn’t have the luxury of fresh fruit and vegetables supplied to us every day of the year, we ate what was in season and enjoyed full flavours developed naturally due to their natural cycle of life.

PAN - ROASTED VINE BABY TOMATOES WITH PINE NUTS

And that’s why at this time of the year (Australian summer) that I thoroughly enjoy the taste and the variety of tomatoes, especially baby tomatoes on the wine, for their aroma, sweetness and juiciness which make them taste great in salads, roasted or pan-fried.

As much as I enjoy them in my summer salads, they become an excellent side dish to accompany your roast lamb or a beef dish.

My favourite way of wine baby tomatoes is just pan-fried them with a handful of pine nuts and a splash of balsamic vinegar to enhance their sweetness and caramelisation.

Here is how I do it.

You need:
One or two branches of vine baby tomatoes
2 tbsp pine nuts
2 tbsp olive oil
1 tbsp of balsamic vinegar
VINE BABY TOMATOES

Method:
Place a pan on the stove over medium-high heat and add olive oil.  Once the oil is hot, add the tomatoes, throw in pine nuts and season with salt and pepper.  Roast tomatoes for about 5 minutes, then give the pan a good shake and continue cooking until the skin on the tomatoes collapses into "wrinkles".  

Splash balsamic vinegar, give another shake and serve alongside your main course.

Enjoy!!!


Saturday, 19 September 2015

SMOKY SWEET POTATO WEDGES

Who does not love potatoes:  fried, sautéed, boiled, roasted – all these delicious variations have been a staple food for millions of people all over the world for centuries.  However, now more and more people are watching their diets and look for a healthier alternative to this “packed to the rafters” carbs loader.
SMOKY SWEET POTATO WEDGES

The solution to this dilemma in my kitchen is sweet potatoes – similarly versatile and very tasty but a much lighter and healthier option.  Two of my most popular recipes are making a mash or roasting them, hence my "Sweet potato wedges" recipe.  I use ground chipotle (smoke-dried jalapeno) because it has this delicious smoky flavour and brings a bit of heat but if you are not a fan of this spice, you can add few dry chili flakes, a pinch of cayenne pepper or hot paprika for an extra kick.


To feed 4 people you need:
2 medium size sweet potatoes
½ tsp smoked paprika
4 cloves of garlic, unpeeled 
1/3 of ground chipotle (optional)
2 rosemary sprigs
Salt and freshly cracked black pepper
3 tbsp olive oil

Method:
Pre-heat your oven to 180C.

Peel the sweet potatoes and cut into wedges about 2 cm thick and 8-10 cm long.  Place garlic on a chopping board and lightly flatten with the back of a knife. I then place them into a plastic bag with all the other ingredients and give everything a good mix.   I learnt this trick from Nigella Lawson, not only does it ensure that each piece is covered evenly with the spices but your hands remain clean.   

Once it is done, empty the bag onto the roasting tray, spray the wedges evenly and place it in the oven. Cook for about 20 minutes, turning occasionally so the wedges get a nice brown colour all over. 
SMOKY SWEET POTATO WEDGES

Serve alongside any meat or fish dish or on its own as a healthy snack.


Enjoy!!!

Sunday, 28 June 2015

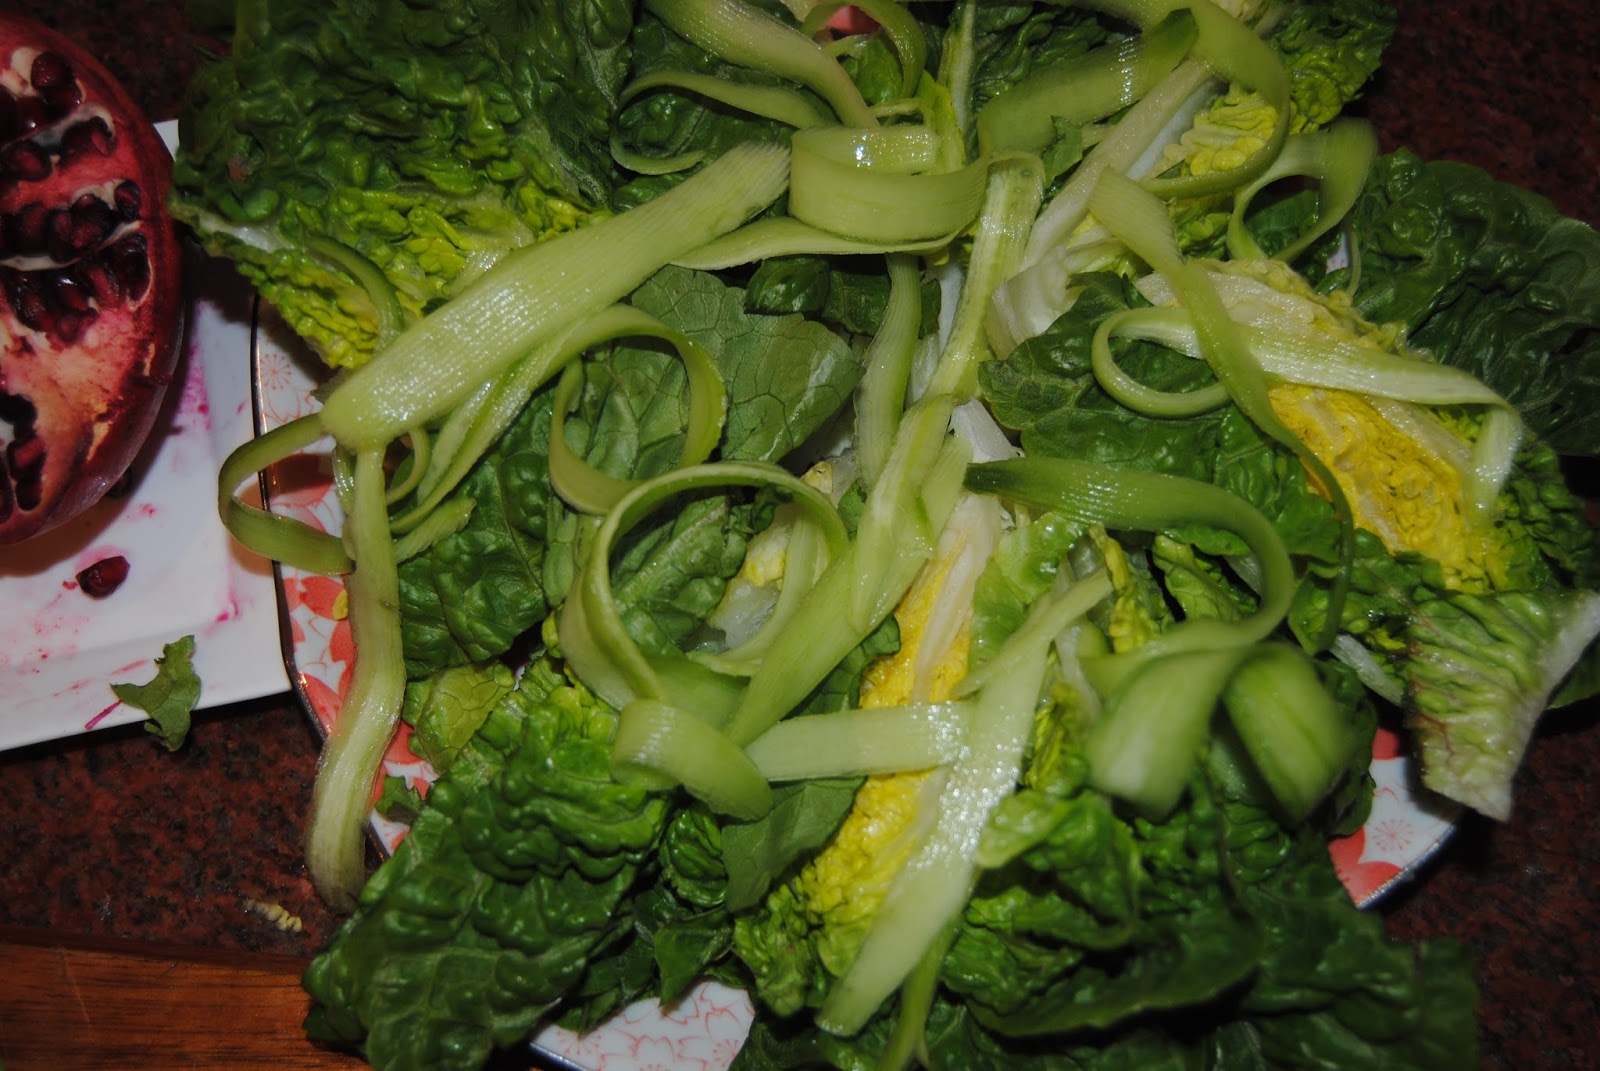
SALAD VERDE WITH RED VINEGAR AND MUSTARD VINAIGRETTE AND POMEGRANATE SEEDS

This salad is extremely easy to make and quick to assemble (there is no cooking per se), it involves minimum of ingredients and most of all, its tangy test and fresh crispiness of the ingredients are a great accompaniment to almost any dish you cook whether it is vegetarian, meat, fish or poultry.  

GREEN SALAD WITH RED VINNEGAR VINAIGRETTE
You need:
2 heads of baby cos lettuce
2 medium cucumbers
A handful of chopped fresh herbs (coriander, dill or parsley depending on your taste)
Pomegranate seeds to serve
 

For the vinaigrette:
3 tbsp extra virgin olive oil
2 tsp red vine vinegar
1 tsp Dijon mustard
½ tsp honey
Salt & freshly cracked black pepper

Method:
Remove the stems from the lettuce and then slice each lenghtwise into quarters and arrange on plate.  

Using potato peeler, remove the skin from the cucumbers and continue peeling off the ribbons until you reach the seeds that need to be discarded.  Place the cucumber ribbons over the lettuce.


Finely chop the herbs and sprinkle over the salad.  Take a whole pomegranate, slice it in half, place one half into the palm of your hand seeds down and holding it over the salad, start beating it with a wooden spoon.  This method should easily release the seeds with minimum damage to their shape.
GREEN SALAD WITH RED VINNEGAR VINAIGRETTE
Place all the ingredients for the dressing into an air-tight container and give it a good shake, taste and adjust the seasoning.

Once satisfied, pour the dressing over the leaves and serve alongside a Whole Roast Chicken or use it as a base for Stuffed Mushrooms.

Thursday, 5 February 2015

GRILLED MUSHROOMS STUFFED WITH FETA

This dish can easily be served as an entree or as a side dish or just as a healthy lunch option.  
Grilled mushrooms stuffed with feta

To feed 6 people you need:
6 big brown mushrooms
150 grams of Persian or Danish feta
2-3 gloves of garlic
4 tbsp extra virgin olive oil
Salt and freshly ground black pepper

Method:
Pre-heat your grill to 180C.  Peel and crush the garlic and then mix it with olive oil, salt and pepper.  Prepare the mushrooms by brushing away the soil (don’t wash them as they absorb water) and cutting off the stems.  Then rub the mixture all over the mushrooms and arrange them on a baking tray stem side up, crumble feta and place under the grill.  Pour a small amount of water to prevent the mushrooms from sticking to the bottom of the tray and ensure they cook equally.

Once the feta is browned, remove from the oven, arrange on a platter covered with baby cos leaves and serve immediately with bread which has been oven-crusted.

Enjoy!!!